If shrinkage cracks are more than 3mm wide, contact our Customer Experience team and we may be able to repair these under your warranty. If the cracks are smaller, they would be classed as normal home maintenance and repairs would not be covered by your warranty.
Cracks in plasterwork
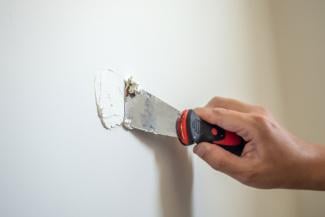
Follow these simple steps for a neat and tidy repair of fine cracks along walls. You will need:
- A filling knife
- Filler
- 80-grit sandpaper and a sanding block
- Paint and brushes
Step by step guide to repairing cracks in plasterwork:
- Put a dust sheet floor covering down directly under the crack you wish to repair.
- Use the corner of the filling knife to widen the cracks you wish to fill. Drag the edge of the knife through the crack, raking out a little of the plaster to make sure that the gaps are large enough to push filler into. Run a dry paintbrush along the crack to brush out any loose dust.
- Wipe the areas to be filled with a damp cloth immediately before applying the filler to help it stick to the surfaces.
- Using the filling knife, push filler firmly into the cracks and flatten down. Leave it to dry.
- Lightly sand back the filled surface until the filler is level with the rest of the wall.
- Wipe with a damp cloth to remove dust and paint to match the rest of the wall.
Cracks around skirting boards and door frames
The most common effect of shrinkage is the appearance of cracks between woodwork and walls. Fortunately, repairing these is pretty straightforward. You will need:
- A tube of white decorators’ caulk
- A sealant gun
- A sharp knife
Step by step guide to fixing cracks around skirting boards and door frames:
- Put a dust sheet floor covering down directly under the crack you wish to repair.
- Unscrew the nozzle from the tube of caulk and cut off the sealed end.
- Replace the nozzle and trim the end at about a 45-degree angle.
- Place the tube into the sealant gun and use it to squeeze out a line of caulk along the crack. You should aim to trail with the longer side of the angled nozzle, as this will help to push it into the crack.
- Finally, wet your finger and run it smoothly along the bead of caulk. This should produce a smooth finish along the join between wood and plaster.
- Leave to dry and paint as necessary.
Repairing nail pops
‘Nail pops’ are a common result of shrinkage and settlement, and appear as raised, round bumps on walls and ceilings. Follow the guide below to fix them. You will need:
- A hammer
- A punch, or a long nail or screw
- A filling knife
- Filler
- 80-grit sandpaper and a sanding block
- Paint and brushes
Step by step guide to repairing nail pops:
- Although we call this issue ‘nail pops’, plasterboard is always screwed into place.
- Put a dust sheet floor covering down directly under the crack you wish to repair.
- Use the corner of the filling knife to dig out any plaster directly over the head of the screw that has ‘popped’.
- Place the tip of your punch, nail or screw onto the head of the screw that has popped and strike the head firmly with a hammer to drive the screw into the wall so that it sits well below the plastered surface.
- Use a dry paint brush to brush out any loose dust from the area.
- Immediately before applying the filler, wipe the areas to be filled with a damp cloth to help it stick to the surfaces in question.
- Using the filling knife, push filler firmly into the hole and flatten down. Leave it just a little proud of the surface and allow to dry.
- Lightly sand back the filled surface until it’s level with the rest of the area.
- Wipe once more with a damp cloth to remove dust and paint to match the rest of the area.


